
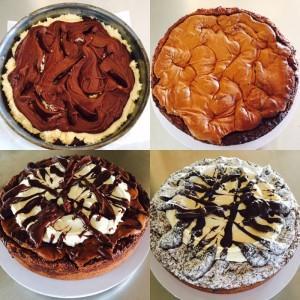
Chocolate Ricotta Cake
Prep Time
Cook Time
Total Time
Cake is baked, topped with white chocolate icing, drizzled with chocolate ganache and edges dusted with icing sugar ... or you can simply dust the whole cake with just icing sugar if you prefer I have tried to convert this recipe to a Thermomix and whilst I do love my dear machine, this is not one for it. Because of the distinct processes it is easier and quicker to use a hand held electric mixer ... if you don't have one I would encourage you to get one ... they are inexpensive and last forever (mine is almost 20 years old), and whilst I don't use mine often, it is a lifesaver when I do. Please pay attention to your tin size ... the original recipe states to use a 28cm round tin, but when I measure the base of my 28cm tin it is actually 26cm ... so the important point here is to measure the base of your tin and as long as it is 26cm wide then the cake will fit into it nicely. Once baked the cake is fabulous simply dusted with icing sugar just before serving ... but as I tend to cook this for special occasions I like to finish it off with a circle of white chocolate icing (see main post for icing recipe) on top leaving a 5cm border, before drizzling with either melted plain dark chocolate, or if I have it in the fridge I will use a little chocolate ganache (see main post for ganache recipe). I always make more white chocolate icing than I need as it keeps in the fridge for up to two weeks, and what I don't use I will then freeze for later. I also do the same with the chocolate ganache as it keeps well in the fridge for a few weeks, and can be added to a whole range of goodies (see main post for options). When reheating ganache do so very gently, I always use the microwave as I can control that better than a pot or pan ... so remove the amount of ganache you need, place into a plastic container (it doesn't hold the heat like glass) and heat for 5 seconds at a time until you get the fluidity that you need ... so depending on the volume you are melting it can take as little as 10 to 15 seconds total. So ... onto the recipe itself: 1. The cake is made up of two mixes … the chocolate mix and the ricotta mix 2. The bulk of the chocolate mix is spread across the base of the tin, that is then topped with all the ricotta mix, and then the last of the chocolate mix is dolloped over the top and a knife is inserted and lightly run through the mix to create a swirled finish (the chocolate mix bakes up similar to a biscuit so is quite firm and almost crunchy, whilst the ricotta mix is more cake like and the contrast between the two is quite delicious). 3. I use three containers (one to melt the chocolate and butter in to start with; one for the ricotta mixture; and one for the chocolate mixture which will eventually incorporate the melted chocolate and butter too) and a hand held electric beater 4. Before you start grease the sides of a 26cm (base measurement) spring form round cake tin (measure it) with butter, and place a piece of baking paper across the base ensuring that it extends outside of the tin (so put a square piece of paper over the base, then snap the side ring into position on top of the baking paper so that it extends outside of the tin) ... this will make it easier to remove the cake as I prefer not to turn it upside down) and 5. Preheat your oven to 170 degrees fan forced placing a rack into the middle of the oven Let's bake ...